
We’ve all been there: you’re drooling over that bright, shiny, new, expensive pedal so you can plug it into your rig and take your playing to the next level.
You wait for it to come in the mail, re–watching demo videos over and over until the day it finally arrives. And the second you power it up and put it in your rig… it doesn’t sound all that great.
This happens to every guitarist, and usually more than once. Now, you’re sitting at home with an expensive pedal that can’t meet your wildest dreams and expectations, and you’re not really sure what to do, short of flipping it on Reverb.
Well, there’s a much cheaper route you can travel next time around — one that can give you practically unlimited control over the tone coming out of the pedals you already have: modding.
With a clunky old pedal — you know, the one this fancy new pedal was supposed to permanently replace on your board — a few tools and components, and a fair amount of patience, you could renovate your tone for a fraction of the cost of a boutique stompbox.
Where to Start
You’re excited to work on your PCB board and get a better pedal than you had before, but how exactly do you figure out what to do with that old Boss compressor you have sitting around?
Thanks to a robust online community, you can do some Googling to find out what you need to change when you're under the hood of your dirt box. Just search the pedal name and then add the word “mod." For example, “Vox V847 Wah Mod."
Try and be as specific as possible, because if you just search “Boss Compressor Mod" you’ll likely pull results for both the CS–2 and CS–3.
You should pull up tons of results from forums like diystompboxes.com and thegearpage.net that will give you a shopping list and instructions written in shorthand.
While we’re talking about instructions, do yourself a favor and take the time to watch some videos about the basics of soldering. It’s a very simple skill, but it’s better to know what to expect upfront. Otherwise, you could do serious damage to your pedal or electronic components with all that heat.
What Kind of Results Can You Get From a Modded Pedal?
There are just short of a million and one results you can get once you mod your pedal. But if you're looking for a place to start, here are a few common things that you'll get with your modded pedal.
Decrease Tone Suck: Tone suck is when you put a pedal in your rig and your guitar loses high–end “sparkle” even when the pedal’s off. Usually the culprit is a non–true bypass pedal that doesn’t have a buffer, and the most common offenders are old wahs and phasers.
Adding Bass: Whether you’re struggling with a thin tone or trying to add distortion to your basslines, this is usually a pretty easy mod to execute that often just involves swapping one or two capacitors.
Changing EQ: Similar to adding bass, you can change many facets of a pedal’s EQ with different capacitor and resistor values. The more specific your EQ goals are, the more down and dirty you’ll have to get with recapping your pedal. But the results are pretty much limitless.
“Better” Distortion: “Better” is always a subjective term, and guys like Kurt Cobain got by just fine with a stock Boss DS–1. But if you’re after boutique drive, switching diodes and integrated chips (ICs) can significantly improve the sound of a pedal's clipping circuit.
Noise Level: This is another common complaint with dirt boxes, but noisiness affects everything from compressors to wahs. Basically, if you engage the pedal and the volume jumps before you play anything, you have a high noise floor. That nasty hiss can often be improved by putting higher quality ICs into your circuit.
More Options: Consider this a catch–all for those tone tweakers out there who want more knobs and switches on everything. You can make any mod optional and, with a sturdy drill, control it from the outside of your chassis.
LED Brightness: Many people struggle to see whether or not their pedals are on when playing in low– and high–light situations. It sucks to go for a breakdown with nothing but your clean tone. You can throw in brighter LEDs and change some resistor values to make pedals easier to see on stage.
What Equipment You’ll Need
You don’t need a whole lot of equipment to get modding, just a few essential pieces.
- Soldering iron at low wattage, around 15 or 20 watts
- Solder, with either flux or rosin core
- Desoldering braid (also known as desoldering wick)
- Heat sink

You don’t need a fancy soldering iron, just a basic $15 to $20 model that you can pick up at any hardware store.
With solder, make sure you avoid the stuff labeled “acid core." Without getting too technical, rosin is a more mild acid in the center of the solder that prevents the metal on your components from rusting while they’re being heated. That’s essential to forming a strong solder joint.
You’ll also want to tin the tip of your soldering iron once it’s nice and hot. All that means is that touch the tip of your iron to your solder to coat the nose of the tip. This will help with a more even dispersal of heat.
Now, since you’re working with already built circuits, you’ll need to be able to remove components and protect important ones.
The desoldering braid will absorb solder when you heat the leg of a component. This will unstick it from the board and let you remove the component. Again, watch some YouTube tutorials on this process.
A heatsick will keep you from destroying your capacitors as you’re adding or removing them. You basically clip it onto the leg of your capacitor that you’re heating up to make sure that you don’t overheat the part.
Acquiring a Pedal
Needless to say, you’ll want to choose a pedal that you don’t feel bad about messing around with and potentially destroying. A dusty old wah sitting in the garage or dirt box that you haven’t plugged in since you were first learning the “Smoke on the Water" riff may be your best candidates.
Low risk option number two is to scour sites where people sell used gear (say, maybe Reverb.com) for a secondhand Boss or Dunlop pedal, which will likely go for between $20 to $40 used. It’s a minimal cost for a guinea pig that will lead to priceless learning experience.
One important thing to keep in mind is that by altering your pedal in any way, you’ll be voiding any existing warranty. That’s why it’s good to learn these skills on relatively cheap, mass–produced pedals that definitely could benefit from an upgrade.
Simpler circuits like wahs, fuzzes, and overdrive pedals are nearly infinitely tweakable to taste. As a general rule of thumb, the earlier a pedal was invented, the simpler its circuit will be to understand. That’s why the varieties mentioned above are the usual suspects.
Also, stick to analog since all of those components can be swapped. Avoid the temptation to mod a reverb or digital delay, at least when starting out.
Working with Components
Usually, mod instructions will give you a list of components broken up into three categories: capacitors, resistors, and diodes.
A good list of components will ideally tell you what you’re taking out, what you’re putting in its place, and the desired material of the new component. Often, you’ll be taking out a cheap capacitor and replacing it with a higher quality capacitor of the same value.
Simply search the stated value and material (i.e. 0.47pf metal film) on a site like Mouser, Arrow, Sparkfun, or Digikey, select the desired unit, and wait for it to be delivered to your door.
When you get to work, it’ll often be easy to figure out which part on the circuit board the instructions are referring to as it’ll be labeled and numbered with a convenient shorthand. If your mod tells you to remove C13, you simply look on the PCB board to find the capacitor labeled C13 and take it out.
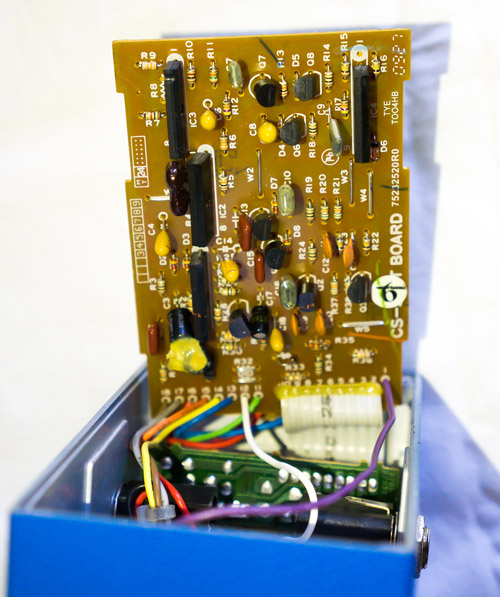
Be careful here, since there are multiple configurations for capacitors that all serve different purposes. Stick to the ones that look like little water towers, little boxes, or cylinders on legs.
Resistors and diodes don’t typically come in a great number of varieties, so you should be fine just putting in the values for resistors (i.e. 2Kohms) and the part number and material for diodes (i.e. 1N34A Germanium).
Resistors and many capacitors aren’t polarized, meaning you can solder them in in either direction and they’ll work exactly the same.
Diodes and certain types of capacitors (aluminum electrolytic and tantalum), on the other hand, are polarized, so you need to make sure you put them in the correct direction. It’s easy to tell how to put in a diode, since they’re marked on your PCB board with a little arrow pointing at a line. There’s a line going across the diode on one end and all you have to do is make sure both lines are on the same side.
If your mod calls for an LED (light emitting diode) in the place of a regular diode, one leg will be shorter and one will be longer. In this case, the shorter leg is on the side with the little line.
When using polarized caps, your best bet on knowing which way to put them in is to take a look at the component you’re taking out. Electrolytic capacitors (which look like tin cans) are marked with a colored stripe up the side of their negative terminal.
Similarly, tantalum caps (which kind of look like mustard–colored Tic Tacs with two legs coming out of them) are marked with either a plus sign over their positive terminal or a minus sign over their negative terminal. Just make sure to put the new component in so that it matches the polarity of the cap you just took out.
If you put one in the wrong way and power up the circuit, it’s best to grab a whole new cap and solder it in, since even a little exposure to power coming in the wrong way can ruin it — sometimes signaled by a loud pop. Having a photo of your PCB pre–alterations on hand can be invaluable, since you can double check your work before you test out any alterations.
Sometimes, you’ll take out a component and put nothing in its place. This is called a “jumper," and all you have to do is keep the excess metal you snipped off one of the soldered legs off a capacitor, resistor, or diode and solder it into place.
Obviously, if this is your first pedal mod, then this is an entirely new language to you. Don’t be afraid to be brave and try out this new skill, even if you feel like you’re in over your head.
If modding a pedal just sounds too scary right off the bat, search Reverb for mod kits that will give you all the parts that you need (and likely some detailed instructions) on how to soup up your pedal. It’s a great way to dip your toes into the water instead of diving in head first.
Some Advice
Patience is everything with modding. It may sound corny, but patience is truly the most important tool in your kit, and probably the one you’ll need to use the most.
Trying to figure out electrical circuits is hard, and this is your first time, so give yourself the leeway to learn and be ready to walk away if you're frustrated. Otherwise, you might make an irreversible mistake.
One helpful trick is to try switching out components one at a time and testing the results. Remove that capacitor and put the replacement in its place to see if you notice a subtle difference in sound. You don’t need to put the pedal back in its housing to plug it in and try the circuit with your amp.
"The whole process can be challenging, but the results can be amazing. With a little patience and the right tools, you’ll be the master of your tone without breaking the bank."
It might be more time–consuming, but could save you that inevitable frustrating meltdown after putting hours of work into a pedal, plugging it in, and finding out it doesn't work without a clear idea of what went wrong.
It also always helps to take a photo of your circuit board before you get started, and make sure you hold onto all the parts you take out. If worst comes to worst, you can put everything back where it was and start from scratch.
If you do get to the end and don’t hear any sound, don’t panic. Check the connections. Is anything loose? Do any solder joints that look matte instead of shiny? Check the input jacks and other areas on the board you might have accidentally heated. If they’re loose or dull–looking, desolder and re–solder those components to see if that fixes the problem.
Conversely, are there any spots on your board where you maybe hit it with a bit too much solder and connected two components that shouldn’t be touching, potentially resulting in a short? Put your solder wick in between the two to clean off those joints and carefully solder them again.
The whole process can be challenging, but the results can be amazing. With a little patience and the right tools, you’ll be the master of your tone without breaking the bank.
Have you had any success with modding your own pedals? Show us the results in the comments below, and let us know if you have any more tips to share.