
Positive Grid Pro Series Studio EQ
This listing has ended
See similar gear from other Reverb sellers

Our users rate Reverb
What it is:
A selection of some of the finest, most customizable equalization plugins around.
How we use it:
Tailor your EQ unit by swapping tubes and tweaking knobs until each track sits perfectly in the mix.
Why it's cool:
Like most PositiveGrid products - the ability to swap out the guts of each unit puts these EQs in a league of their own. MATCHING EQ
After years of research and development with the world’s best DSP engineers, we are proud to introduce a new way of EQ matching, one that truly recreates real world outboard analog equalizers – for the first time at component level. We used analog filters to match the frequency response for each EQ module: digital, tube, and passive EQ.
The EQ match works by analyzing the signal from the input track and side chain track – you can even see the frequency response of the matching process in real time. It then analyzes the difference curve between input and side chain, and automatically adjusts the controls to match the different curves.
The Pro Series EQ match process uses analog filters to match the frequency response difference, without adding post filters to compensate the frequency response difference. The end result is a more natural sound with real world analog sound characteristics.
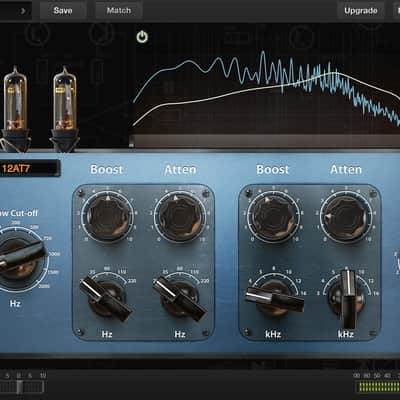
TUBE EQUALIZER
Loaded with 12AX7, 12AU7 and 12AT7 preamp tubes, the tube EQ captures the essence of analog EQ found in the best professional studios in the world, giving you the ultimate solution to add color and warmth to your recordings. It comes with low, mid, and high control panels so you can get a full frequency range control in one single EQ module.
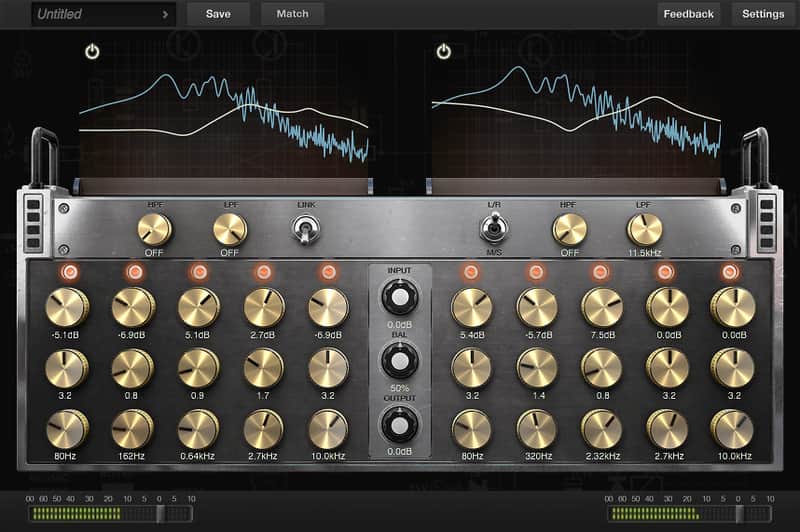
DIGITAL EQUALIZER
Provides the most clear and transparent digital EQ sound ever in a plug-in. With 5 bands plus high pass and low filter for each channel, its wide range control will give your mixes the necessary sound balance for professional use. You can also use the digital EQ module to shape your tracks tone without altering the output signal.
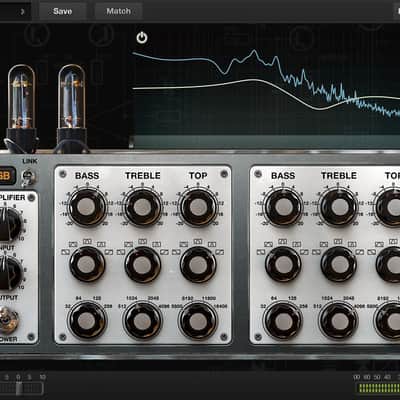
PASSIVE EQUALIZER
With 3 band controls for each channel, the passive EQ module gives an authentic analog sounding EQ shaping for a more musical mix. You can use the available tube power amplifier emulation to add even more color to the output sound, and get that rich tone from real world tube amplifier EQ racks.
Compatibility
Mac:
- OS X 10.9 or later
- Audio Units, VST, RTAS, AAX Native
- 4GB of RAM minimal, 8GB or more recommended
- 400MB free disk space
- Pro Series plug-in requires A DAW software (Digital Audio Workstation) to host, it doesn’t have a Standalone version at this moment.
- Windows 7 (SP1) or Windows 8, Windows 10
- VST, RTAS, AAX Native
- 4GB of RAM minimal, 8GB or more recommended
- 1.5GHz Dual core processor minimal, 2.0GHz Dual core or more recommended
- 250MB free disk space for per version (32 or 64 bits)
- Pro Series plug-in requires A DAW software (Digital Audio Workstation) to host, it doesn’t have a Standalone version at this moment.
- Ableton Live - 8.0 or above.
- Avid Pro Tools - 10 or above.
- Ardour - 3.0 or above.
- Apple Logic Pro - 9.0 or above.
- Apple GarageBand - 6.05, 10.0 or above.
- Bitwig Studio - 1.0 and above.
- Cakewalk Sonar - X2 or above.
- Cockos Reaper - 3.4 or above.
- Harrison Mixbus - 2.0 or above.
- Steinberg Cubase - 5.0 or above.
- Steinberg Nuendo - 4.3 or above.
- MuTools MuLab - 6.0 or above.
- PreSonus Studio One - Producer/Professional 2 or above.
Installation Instructions
To Register:
- Create a Tone Cloud account at https://store.positivegrid.com/
- Go to https://store.positivegrid.com/redeem
- Enter your redeem code then press the Redeem button with your Tone Cloud account logged in.
- If the redeem is successful, the webpage will redirect to the installer download page. If you have downloaded and installed the latest version of Pro Series Studio EQ, please ignore the download page.
- Open Pro Series Studio plug-in, press the Upgrade button and log in with your Tone Cloud account to activate the license.
General Instructions:
- We auto-detect your computer operating system, so just click the download button above.
- Find the downloaded plugin (it's in your computer's download folder, or wherever you've chosen to save it) and double click the installer.
- A plugin installer window will open. Simply go through the installation process.
- We will also send you an email with a link to re-download in case you need it.
- If Ableton Live is closed, open it and skip to #5.
- If Ableton Live is already open, go to Preferences.
- Go to Files & Folder.
- Click "Rescan plugins".
- Find the plugin in the Ableton plugins folder in the sidebar.
- Drag-and-drop the plugin onto your track at the bottom of the screen.
- Open Logic Pro X. Newly installed plugins should be detected automatically every time Logic is opened.
- If you've downloaded an effect or utility plugin, these can be used on an insert for any track in the mixer.
- Create a software instrument track if you downloaded a virtual instrument plugin.
- Under Default Patch, go to AU Instruments and choose the plugin you just installed.
- Open Pro Tools. Newly installed plugins should be detected automatically every time Pro Tools is opened.
- If you've downloaded an effect or utility plugin, these can be used on an insert for many types of tracks (Audio, Aux, Instrument, Master Fader...)
- If you’ve downloaded a software instrument, create a new Instrument track.
- Navigate to the Mixer and locate the newly created Instrument track.
- Select the desired instrument plugin by clicking on any of the Inserts on the Instrument track.
- Go to the Reverb SYNC Software and plugin Collection.
- Choose your desired plugin.
- Reverb will auto-detect your platform, so simply click the download button.
- Continue the installation process by following the prompt.
- Hover your mouse over the smart control button.
- Click Show Inspector icon.
- Click on plugins and choose your desired plugin.
| Brand | |
|---|---|
| Model |
|
| Categories |
Product safety information may be available here.