A1Audio A1TriggerGate
This listing has ended
See similar gear from other Reverb sellers

Our users rate Reverb
What it is:
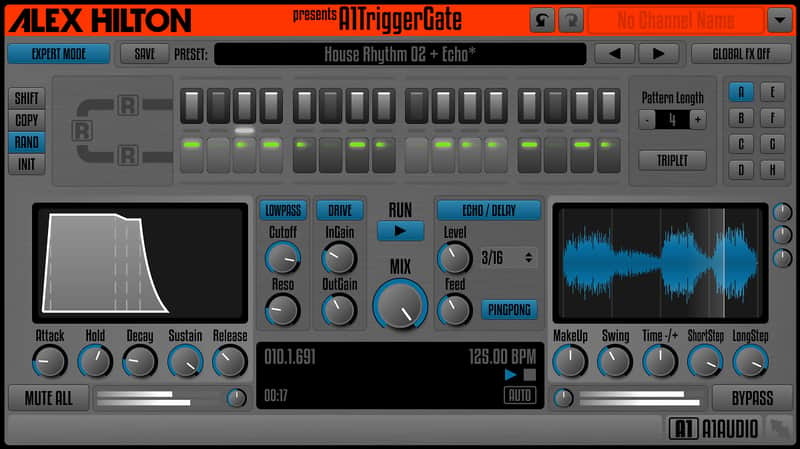
A sequencer which plays audio samples via a series of triggers.
How we use it:
As the rhythmic foundation to our tracks.
Why it's cool:
The various effectors and parameters allow you to experiment with audio in a new and simple way. There are many sequenced / rhythmic gates out there, but honestly nothing really satisfied me yet. So I decided to write my own plugin for this task.
Some years ago it was a very popular producing style in all the dance music genres to have at least one 'rhythmic gated' sound in almost every production. Nowadays this powerful production technique for achieving more rhythmic dynamics gets its revival in house music, dubstep, trap, hip-hop and even pop tracks.
Pattern Sequence:
Each section of step length buttons & step volume faders represents one beat of your pattern sequence. You can choose between 'NoStep', 'ShortStep, 'LongStep' and 'StepLink' by simply pressing a step length button. Each beat consists of 4 steps (1/16 notes in 'Normal Mode') or 3 steps (1/8T notes in 'Triplet Mode') and each step has its own step volume fader above to dial in its relative level.
Integrated FX:
The integrated FX (Lowpass Filter, Drive/Distortion and Echo/Delay) are designed as easy as possible. No vast amounts of parameters to dial in to get the desired effect on your sound. Simply turn it on and tweak it a little and you're ready to go! Of course there is a 'Global FX Off' switch to step through all presets without any of the integrated FX. Professional producers will appreciate that little feature.
Get some 'random' inspiration:
If you are looking for the right groove or just an interesting rhythmic pattern, sometimes it is a good way to let my plugin provide you with some random patterns. Just press 'random' several times and use the sequence you like. It's simple as that!
Have fun with my new plugin! Best regards from Germany,
Alex Hilton
Compatibility
The majority of plugins hosted on Reverb run on both Mac and Windows operating systems. General minimum requirements are as follows:
Mac:
- Mac OS X 10.7 - 10.11.
- Pro Tools 10 and above, Ableton 9 and above, Logic Pro X and above, or any host compatible with VST/AAX/AU.
- Intel Core i3 / i5 / i7 / Xeon
- 2GB RAM.
- Display Resolution of at least 1280 x 1024px
PC:
- Windows 7 - 10.
- Pro Tools 10 and above, Ableton 9 and above, FL Studio 12 and above, or any host compatible with VST/AAX.
- Intel Core i3 / i5 / i7 / Xeon
- 2GB RAM.
- Display Resolution of at least 1280 x 1024px.
Installation Instructions
General Instructions:
- We auto-detect your computer operating system, so just click the download button above
- Find the downloaded plugin (it’s in your computer’s download folder) and double click it
- A plugin installer window will open, so go through the installation process
- We will also send you an email with a link to re-download in case you need it
How to install plugins in Ableton Live:
- If Ableton is closed, open it and skip to #5
- If Ableton is already open, go to Preferences
- Go to Files & Folder
- Click “Rescan plugins”
- Find the plugin in the Ableton plugins folder in the sidebar
- Drag-and-drop the plugin onto your track at the bottom of the screen
- Open Logic Pro X
- Create a software instrument track if you downloaded a virtual instrument plugin
- Under Default Patch, go to AU Instruments and choose the plugin you just installed
- If you downloaded an effect or utility plugin, you can insert them on the mixer