Technology has done a lot to improve, diversify, and expand the music-making process. We can create more ambitious and elaborate productions quicker than ever before and mix them in a far more efficient and precise way. Sometimes, though, the digital quality of music can overwhelm a project, removing that important, distinctly human element and feel.
There are many ways you can inject life back into songs that start to sound overly digital, both in the production and mixing stages. By experimenting and getting your head around what the idea of saturation is, for instance, you can bring a seemingly lifeless song or section to a place that's warm, organic, and full.
Today, we're going to explore the idea of saturation and how you can use it to bring a new creative spark to your sessions.
Audio Saturation Basics
As production gets more and more digital, we’re constantly searching for ways to “warm up” the signal path. This is where saturation comes in handy.
The term “saturation” originally comes from the amount of magnetism a magnetic tape could hold. But the term doesn’t only describe tape. Saturation also means to overload tubes or transistors.
There is a thin line between when saturation becomes overdrive and overdrive becomes distortion, but they are all different stages that begin with saturation. This “light distortion” is what we're after. We can add color by adding saturation, which, in turn, allows us to add tone or character to the signal path.

Studer Tape Machine
Different Types of Saturation
There are many sources of saturation, but tubes, transistors, and tape are the main sources — all of which have their own distinct sound. Tape saturation, for instance, can give you an EQ bump in the low end and dampen the highs, which is sometimes referred to as "Studer bump" in reference to famed Studer tape machines.
Transistor saturation in audio comes from overloading the input our output levels. This comes in very handy with things like SSL channel strips or Vari Mu-style compressors, where you can actually drive the input signal to the point of saturation.
Tube saturation is the tone that comes from tube amps and can range from subtle saturation to subtle overdrive to full-on distortion. This is, of course, a common form of distortion technique in guitar amps, but tubes are also built into many EQs and compressors and give them something special as well.
When to Apply Saturation to the Mix
Now that we have gone over what saturation is and the three main types, we can start to figure out some techniques for applying it to your production. In a completely digital mix that has been produced and worked "in-the-box," we can start by using saturation to bring interesting harmonics to the party.
This can be applied to individual channels at times, but the main focus is on groups and bus stages. This starts to bring in desirable “gluing” and console summing effects and allows a certain analog randomness. If you have a dry drum group and we want to bring it to life, you may want to focus on console strips on the per-channel basis where we can drive a bit more of the input gain and then move on to “gluing” with warm tubes on the drum group with something like a Manley Vari-Mu or PSP Vintage Warmer.
Keep in mind that you want to avoid using the same type of saturation or color multiple times in the same signal chain as this will result in build up of some of the resonating frequencies or harmonics that occur. This can render the final output as two-dimensional and bland a lot of the time. So if we do console-style saturation on the channels, tubes on the group, we then have a combination of saturation that can interact with one another in a unique way.
This same thing goes for the mix bus. I really like the McDsp Analog Channel as first stage on the mix bus. This can be utilized for saturation at pretty much any part of the signal and sounds fantastic. We then have a console sound or tone to glue it all back together after treating them individually and on a group basis.

McDSP Analog Channel
Adding Vocal Depth with Saturation
Another great time to use saturation is on vocals. Here you can use saturation as well as its heavy-handed brother, distortion.
The basic concept is to use a heavily distorted vocal channel to complement the regular vocal track as a form of parallel mixing but with saturation. This will warm up the entire voice and allow it to cut in the mix in a better and stronger way. Once you have everything combined, you will want to EQ the whole group to ensure that both tracks will work well as when summed.
There are many more ways to use saturation in the mix but this is one of my favorites that has always served me well. Here's a step-by-step guide of how to do this with some audio clips added in.
Step by Step Guide to Using a Filtered Saturation Technique
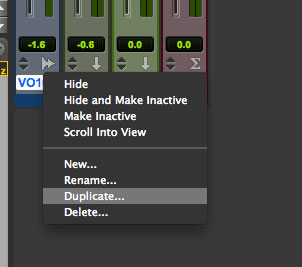
First, duplicate the vocal channel. You can do this after you've slight EQ and compression on the vocal channel as direct insert. The magic will happen on the second, duplicated vocal channel.
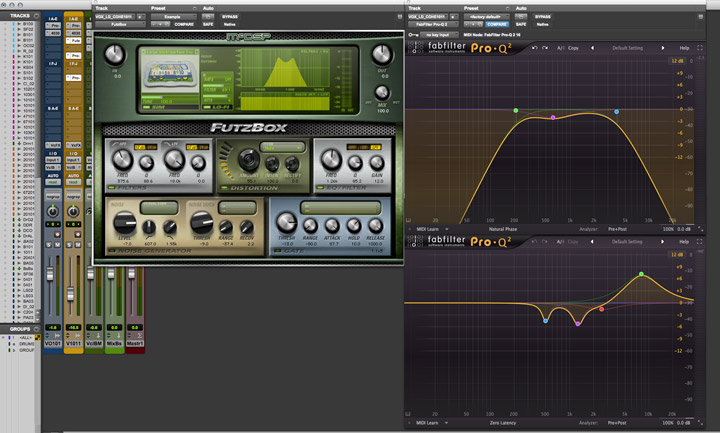
Next, on the second channel, you can apply a heavy EQ filter alongside saturation and distortion effects via plugins. I am using the McDSP Futzbox here. As a bonus step, after you have run the heavy filter that leaves the mid-range of the vocal track in place, run a lift EQ to bring it back to life and add a little crispness. You can always adjust the EQ and distortion to taste.
Now, you can go back in and apply different types of saturation at different stages in the mix.
So far, we have direct insert compression and EQ on our main vocals track alongside with distortion and saturation on the duplicate vocal channel with heavy EQ filters to give it a “tube” sound in the mid-range. From here, you can group of the vocals and apply, say, a tube compressor or even something like a tape emulation to “glue” the two vocals together. After that, you can send the vocal bus to the mix bus where once again, additional character can be added via compression or saturation.
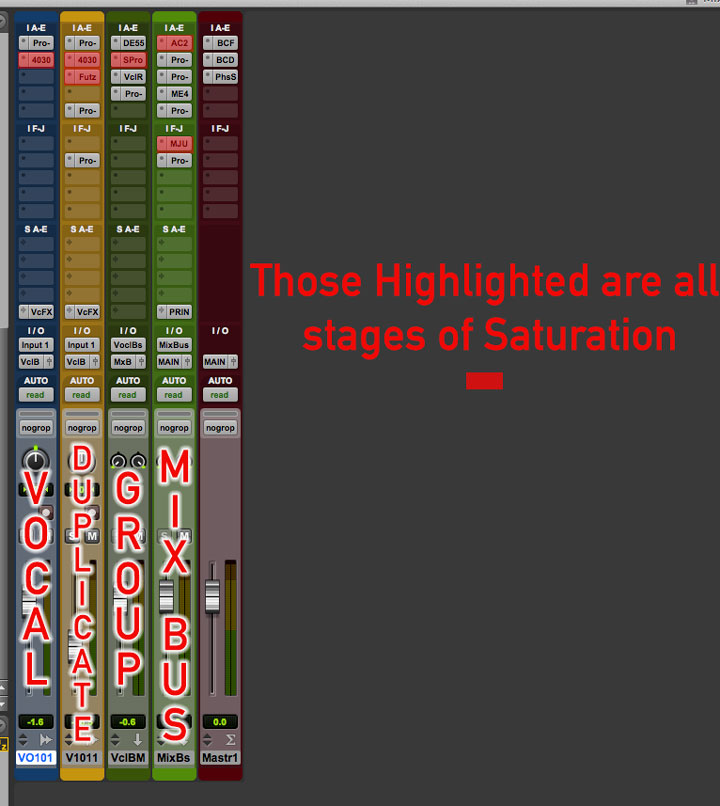
The key is to be careful and use a little bit of different types at each stage. In summary of our example here, we have a dry but compressed lead vocal channel, a filter distortion EQ duplicate channel, slight tape saturation on vocal group, and a tube compressor on mix bus. This all comes together to add four examples of saturation to the track, all while glueing everything together in a warm and organic-sounding way.
To hear how this all sounds, here's a vocal sample from a song I worked on called “Revivalist” from a band called Neon Mountain.
The first sample is just the dry vocal which just has some slight compression.
The second clip is that vocal channel with some light saturation applied direct to the audio channel via a tube emulator.
The third clip has that same vocal track combined with duplicated, distorted voice underneath.
The fourth clip gives you the full mix without group level saturation or mix bus saturation.
The final clip has everything together with saturation on the groups and mix bus as well.
Chain Order Makes a Difference
The order in which you place your chosen saturation effect also makes a big difference. I like to EQ before hitting something like a tube saturation to pull the low end out from hitting the tubes too hard. That said, I also like to run EQ after tape saturation to then elaborate on the bias that I just put into the signal and rounded off.
Running a compressor after a saturation will increase the overall noise floor if there is one which can offer an interesting effect. If you want it to be more clean, it's best to run the compressor before hitting any final saturation stage. At the end of the chain, saturation is an effect tool for groups or the master.

Always Experiment
It can be easy to get carried away with techniques like saturation application, and it's important to not overdo it in your mix. Focus on using saturation both on dry elements and on group and bus stages to help develop harmonic interlacing.
Trying different saturation sources and emulations across a wide spectrum will also give you more interesting results. For instance, try using tape on drums, tube on voice, and transformer or transistors on synths all of which can bring something exciting to the project. After you do this, you can always try and glue it all back together with one main choice of character or tone such as a VCA compressor on the mix bus or some other form of light saturation in compression stage.
Each choice of saturation and where you put in the chain and on what elements before bringing them all back together with summing/gluing saturation techniques can be key in bringing more analog qualities to you project while still remaining in-the-box. There are endless possibilities to achieve unique, cool and very analog-sounding mixes made from your laptop at home, and saturation is just one of many tools you can employ to help find your distinct sound.