Editor's note: The following has been excerpted from Craig Anderton's book How to Record and Mix Great Vocals, from Hal Leonard's 12-part Musician's Guide to Home Recording book series. You can order the ebook here or the softcover from Hal Leonard. To read more excerpts from the series, check out "Optimizing Latency with Computer Recording" and "Linear-Phase vs. Regular EQ: Which Is Better?"
Double-tracking a vocal is the process of singing an additional, duplicate vocal on top of a main vocal to thicken the overall sound. Doubled vocals are typically mixed around –3 to –10 dB behind the main vocal to avoid competing with it. Because it’s impossible to sing a vocal exactly the same way twice, there will be slight timing and pitch differences that add interest and depth. The potential tradeoff is that a doubled vocal may sound a little less focused, but sometimes that’s exactly the effect you want.
Key Takeaways
- Doubling vocals is a popular technique, but be careful about setting levels—the doubled track should support the main vocal, not compete with it, unless you want a more diffused vocal effect.
- Pitch correction software can also produce automatic double-tracking effects.
- If you can’t quite hit the harmony notes, you can choose to correct existing notes with pitch correction or even transpose a copy of your main vocal to synthesize a harmony.
- When layering vocals, having common start times and fadeouts produces a tighter sound.
Automatic Double-Tracking (ADT) Plugins
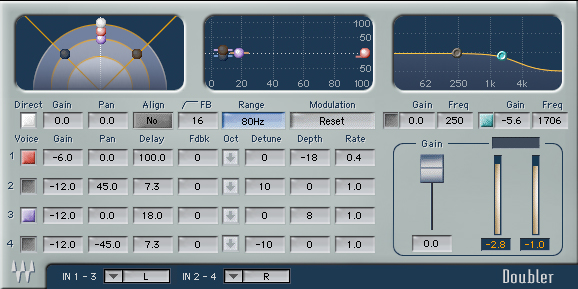
Although it’s easy enough to re-record a vocal, some vocalists have a hard time reproducing exactly what they sang. For these situations, there are plugins that can process the original track by introducing the pitch and timing variations associated with double tracking (Fig. 1).
Pseudo-ADT with Pitch Correction
Although dedicated plugins like the one above can provide double tracking, many people are surprised to find that pitch correction software has the necessary tools to provide electronically generated doubling effects. The following example is based on Celemony Melodyne, but the principle is the same for other pitch-correction software.
(Note: When using pitch correction software, the doubling effect works best with vocals that don’t already have extensive pitch or timing correction.)
- Duplicate the original, uncorrected vocal track.
- Open the track in Melodyne. Note that programs with ARA (Audio Random Access, a protocol created by Celemony and PreSonus) can typically open Melodyne like any other clip effect.
- Select all the notes in the vocal.
- Turn up Correct Pitch Center to about 60%.
- Turn up Quantize Time Intensity to about 60%.
- Audition the ADT effect.
- If necessary, tweak the pitch and timing correction amounts for the most realistic results.
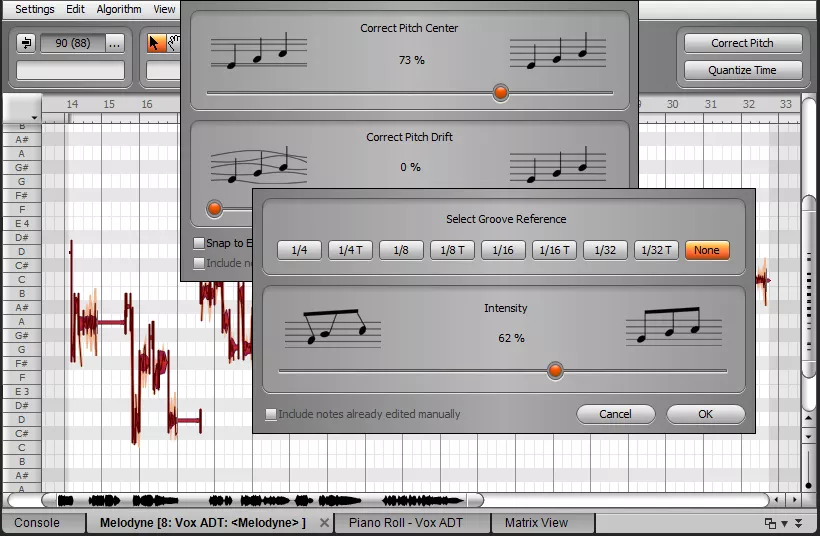
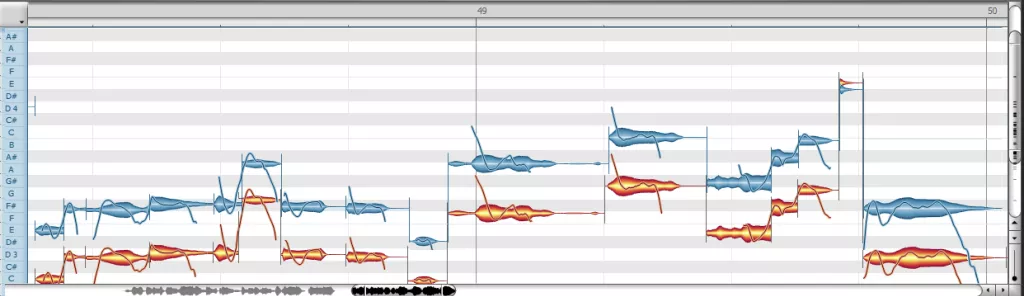
You generally don’t want the doubled vocal to have too much pitch or timing correction—just enough to be different from the main vocal (see Fig. 2).
Shifting Pitch to Create Pseudo-Double Tracking
This trick is as old as the Eventide Harmonizer (trademark Eventide), when engineers discovered that shifting pitch downward and mixing the harmonized signal behind the unprocessed vocal added a useful thickening effect. You can do this with any hardware or software pitch-shifting processor. If you want to triple the vocal, add a second pitch shifter and shift up by an amount equal to the downward shift of the first pitch shifter. When tripling, you may want to increase the overall amount of shift in each direction.
Here’s how to create this effect.
- Copy the vocal track you want to thicken, so you now have two tracks of the same vocal.
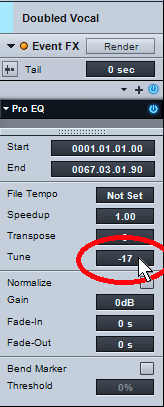
- Apply a pitch shift plugin or hardware processor to one of the tracks. A good starting point for pitch shifting is –15 to –30 cents. Alternatively, you may be able to detune the track itself, if the option exists (Fig. 3). In this case, you won’t need to use a separate plugin.
- If using a plugin, set the mix parameter to 100% processed sound (you want only the pitch-shifted sound). If the plugin has a feedback parameter, set it to 0.
- If delay time and modulation are available, try modulating pitch very slowly over a range of about 3 to 15 ms. This adds a bit of variety.
- Mix the doubled track down so it doesn’t compete with, but instead complements, the lead vocal.
How to Mix Double-Tracked Vocals
When mixing, centering the two vocals gives an effect similar to chorusing; the vocals sound somewhat more diffused, which works well for gentler material. This also gives the thickest sound. Panning them slightly opposed (about 30% right and 30% left) can give a more spacious sound in stereo, and sounds more like two individual vocals instead of a composite effect (which may or not be what you want).
With sparser mixes, centered panning often works best; for dense material, like hard rock with lots of distorted guitar, spreading the sound somewhat gives the vocals more presence. However, these aren’t rules, because ultimately, the song itself will dictate what works best in the final mix. Besides, you can automate the panning to place the vocals as appropriate for particular parts of the song.
The Doubled Vocal Fix
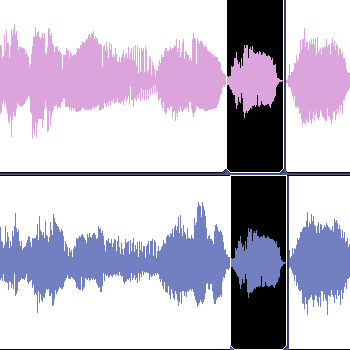
Suppose you’ve recorded a really great doubled vocal part, but unfortunately, for one short phrase only one of the two tracks has a perfect take. One way to fix this is to copy the perfect part into the other track, then delay it by 20 to 35 ms. This will be just enough to make it sound like it’s a doubled vocal (see Fig. 4).
Creating Harmonies with Pitch Correction Software
When you can’t quite hit the high or low notes, or your voice loses power at extreme pitch ranges, pitch correction software can usually help by applying pitch transposition. (There are limitations, though; transposing too far can give an unnatural effect).
If you don’t have a wide vocal range, you may have to choose a vocal’s key very carefully to make sure you can hit the high harmony notes; however, this might compromise the sound of the low notes, pushing them out of your comfort zone. This is where pitch correction can help. You can use pitch correction to fix high notes that are just a bit out of your range, allowing you to choose the optimum key for the lead vocal and use pitch correction where needed for the harmony.
Most of the time, I can hit the harmonies, so I’ll sing them and bring in pitch correction to the harmony if needed. But there’s also merit to using pitch correction to generate a harmony electronically, even when you can hit the notes—the timbre has a different character that works well in some musical contexts. Another benefit is that you can experiment with synthesizing different harmony parts, then learn to sing them and replace the synthesized versions.
Here’s how to create harmonies using Celemony’s Melodyne Essential, although the same basic principles apply to other pitch-correction software:
- Duplicate the lead vocal.
- Open the lead vocal in Melodyne (programs that include the Audio Random Access protocol can typically open Melodyne like any other clip effect).
- Solo the lead vocal and the duplicated vocal. Your host software’s dim solo function can be useful for this application so you can hear the vocals along with the rest of the song.
- Adjust the pitch of the duplicate track’s blobs to create the harmony (see Fig. 5).
Often the easiest way to create a harmony like this is by ear; however even the basic version of Melodyne (Melodyne Essential) can display different reference scales indicating where the scale steps fall. If you’re theory minded, you can always apply the rules of harmony to determine which pitches to use for your harmonies. Also consider turning off chromatic snapping for pitch, and adjust the harmony pitch by ear. Sometimes you might want the harmony just a little bit sharp or flat to add a little more tension.
Feel free to combine this process with the previous suggestions for creating pseudo-automatic double tracking with pitch correction. Applying those techniques to the harmony line can help establish it as an independent entity.
Techniques for Layered Vocals
Layering vocals—singing multiple vocals and stacking them on top of each other—is a common technique to thicken a vocal part, whether applied to a solo voice or to a massed group of backing vocals. However, there are certain considerations with layered vocals that don’t apply to single vocals, because layered vocals need to have a coherent, solid vibe. Words can’t start or end at different times, unless you’re going for a certain looseness. For tight vocals, there are several DAW techniques that can give the kind of feel you want.
Dealing with Inhales
Inhales are a natural part of singing; however with multiple voices, inhales often don’t occur simultaneously. For a more unified sound, pick two inhales that are in sync (or just one, if there aren’t two together), and delete the other ones by cutting from the start of the inhale to where the note begins. Adding a slight fade at the edits will make for a smoother transition, although the inhales you’ve kept will likely smooth over these transitions anyway.
If you want to keep an inhale but find that it’s too prominent, try fading in on the inhale to make it less obtrusive while still retaining an authentic vocal quality.
Fixing Notes that Don’t End at the Same Time
If one note is short compared to another that’s the correct length, split the short clip just before the last word, and use the host program’s DSP time-stretching function to lengthen that one word. In some cases you can split a note during the note’s sustain, stretch the end longer, and then crossfade the split region to make a smooth transition between the main part and the note’s sustaining end. This can give a more natural sound if you need a fair amount of correction.
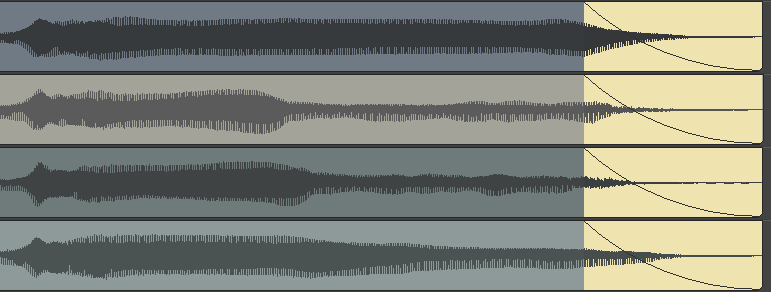
A note that extends too long is easier to fix—just fade it so its length matches the reference vocal, or split during a sustain and move the end closer to the beginning, with crossfade enabled to provide a smooth transition between the two. For a really uniform sound, group all the vocal clips together and add a common fade so that they all fade simultaneously. This creates a super-precise vocal sound, but because you’re not processing the vocal itself, the sound is natural (see Fig. 6).
Shifting Vocal Formants
Formants determine vocal timbre, and different people’s voices exhibit different timbres because of their vocal formants. For example, Mickey Mouse’s formant produces a bright, high timbre, while Darth Vader’s formant creates a timbre that’s dark and low.
You can add variety to vocals by changing the vocal formats, particularly if you’re singing all the layered vocal background parts yourself. For example, if you’re singing three background vocal parts, you might want to give one of them a brighter formant and another a darker formant. Formant editing isn’t that common with software, although Melodyne’s editor and studio versions provide formant editing options.
Back in the days of tape, a common technique to change vocal formants was slowing down the tape somewhat, singing to the slowed-down track, then speeding it back up again. This brightened up the voice’s formant, and had the side benefit of tightening up the timing. Most recording software has some way to vary pitch, either for the project as a whole or for individual clips. If you can change the project tempo, then you can use the same technique as tape: slow down the project (or speed it up, if you want the vocal to sound deeper), sing along, then bring the project speed back to pitch.
Bussing
To avoid having to mix multiple vocal tracks simultaneously, set up aux sends in each of the layered vocals, and have each send terminate in a single stereo return. Not only does this make it a lot easier to mix because you need adjust only the single return instead of all the individual tracks, but you can also use a common signal processor (like a bus compressor set for a modest amount of compression) to “glue” the layered tracks together. A bussed, individual stereo output also lends itself well to reverb, because the voices sound like they’re in a common acoustical space.
If you don’t need a common effect on all the tracks, an alternate to bussing is to group the track levels together so that varying one fader varies all faders in the group.
About the Author: Craig Anderton is an internationally recognized authority on musical technology. As a musician, producer, and engineer, he has played on or produced over 20 albums and has mastered hundreds of tracks. He has authored over 35 books and more than 1,000 articles for Guitar Player, Sound on Sound, Electronic Musician (which he co-founded), Pro Sound News, Mix, and several international publications. Visit his personal website here.