iZotope Nectar 2 Vocal Production Suite
This listing has ended
See similar gear from other Reverb sellers

Our users rate Reverb
What it is:
A plethora of audio tools designed specifically for all things vocals.
How we use it:
From de-essing to pitch correcting, Nectar 2 is the perfect companion for any vocal endeavor.
Why it's cool:
Nectar 2 allows you to create and save your own presets alongside 150+ factory presets so you can take less time to tweak knobs and more time defining your sound.
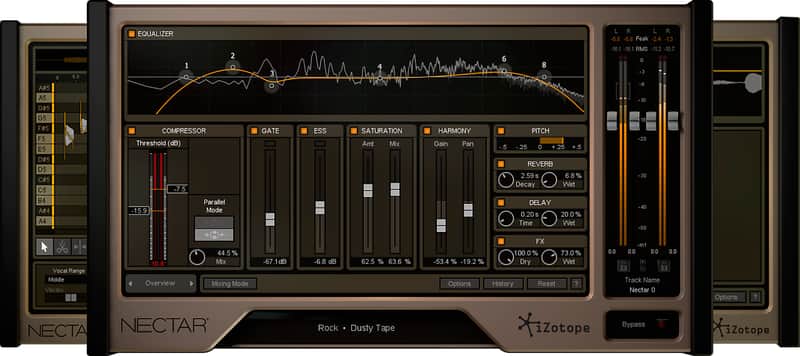
Bring a vocal track to life with the only complete set of tools designed specifically for voice. Add impact with modeled plate reverb, harmonic saturation, and a wealth of creative effects. Stay in tune with real-time Pitch Correction and remove distracting breaths without tedious, time-consuming editing. Instantly transform a single vocal take into a dynamic, harmonized ensemble. Whether you're tracking or you're mixing, Nectar 2 delivers professional vocals in an instant.
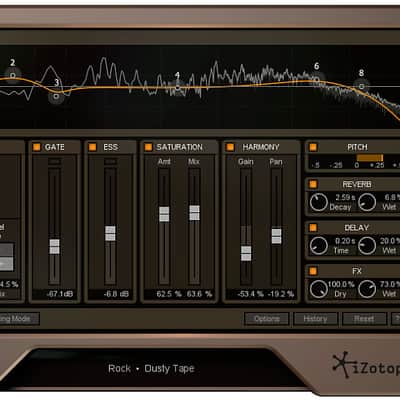
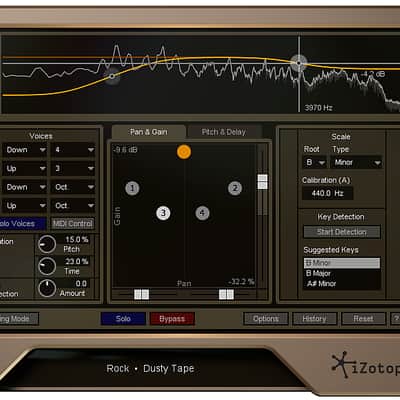
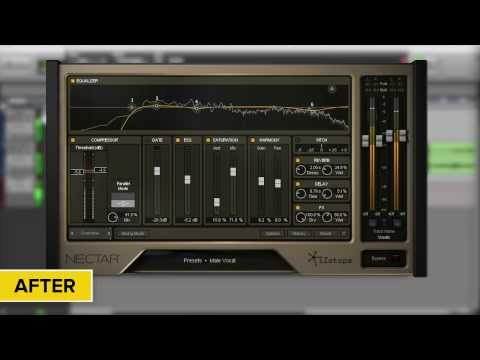
Key Features- Explore 11 powerful tools in one plug-in: Plate Reverb, FX, Pitch, Delay, De-Esser, Saturation, Compressors, Gate, EQ, and Limiter.
- Effortlessly correct off-key notes in your vocals automatically with real-time Pitch Correction.
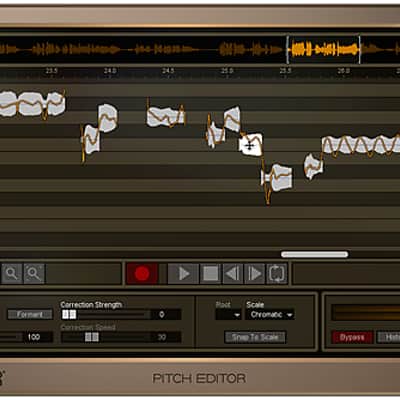
- Get smooth, pitch-perfect takes quickly with dedicated Pitch Editor and Breath Control plug-ins in the Nectar 2 Production Suite.
- Finesse your sound with surgical detail using powerful advanced controls.
- Improve vocal production at all stages, from tracking through mixing.
- Rapidly audition different vocal sounds with 150+ presets, in a variety of genres from classic to modern.
Producers -- Your time is precious. Spend it polishing your sound, not hunting for it. Nectar lets you set up your favorite vocal settings as presets and quickly recall them for next time.
Engineers -- Forget hardware. Nectar offers in-the-box solutions with deep control and simple routing. Instantly assemble a custom vocal chain for any artist or situation.
Musicians -- A distinctive vocal sound sets your act apart. Apply deep flexibility to our professionally designed presets for a quick start—and stay in tune with real-time Pitch Correction.
Voiceover Artists -- Get the vocal presence you've always wanted with Voiceover & Dialogue presets, then make quick corrections for pesky sibilance, volume fluctuations, and unwanted breaths.
Compatibility
Supported operating systems:
- Windows: XP (32-bit Service Pack 3), 7, 8, 10
- Mac: OS X 10.6.8–10.11
- AAX (Pro Tools 11-12)
- RTAS/AudioSuite (Pro Tools 7.4-10)
- VST and VST 3
- Audio Unit
Nectar 2 works as plug-ins in popular hosts* like Pro Tools, Cubase, GarageBand, Logic, Ableton Live, Reaper, StudioOne, Audition, SONAR X2 & X3, ACID, Vegas, Sound Forge, and many more.
*Please note: The Pitch Editor plug-in included with Nectar 2 Production Suite is not compatible with some hosts like Sound Forge, GarageBand, ACID, Audition, and Samplitude.
Installation Instructions
First Time Users:
If you haven't already, create an account with iZotope: http://www.izotope.com/en/account/log-in/
- Download your installer (Mac or PC) from your account. Once the file has finished downloading to your computer, you will need to open and run the installer.
- Once you have gone through the install wizard and accepted the software license agreement, you will be prompted to select which features you would like to install. If you are not sure what you will need, it is advisable to just leave the default options ticked and press 'Continue'.
- Once you have selected your install features, press 'Continue' and start the 'Install'.
- Near the end of the installation, you will be prompted if you would like to 'check for updates to iZotope software', press yes on this prompt, and your plug-ins will be scanned to see if there are any newer versions for any of your iZotope products.
- If any updates are found, you will be prompted with an updates window where you can follow the on screen prompt.
- Once the installation is complete and all checks have been run, you will be prompted with an installation was successful window, which you can then 'Close'.
- When the installation is finished, you will next need to open and authorize the product. It is always best practice to authorize using the standalone version (if available).
- The first time launching for product, you will be prompted with an Authorization box. After clicking 'Authorize' you will need to enter your serial number and the Name and E-mail address used to create your iZotope user account. [If you intend to use your software offline, here you will need to press the 'Offline Authorization' button and follow the on screen instructions.]
- After pressing 'Authorize' you will see a pop-up box confirming your details for you to then press 'Submit'. Your software should now be fully authorized and ready to go!
- We auto-detect your computer operating system, so just click the download button above.
- Find the downloaded plugin (it's in your computer's download folder, or wherever you've chosen to save it) and double click the installer.
- A plugin installer window will open. Simply go through the installation process.
- We will also send you an email with a link to re-download in case you need it.
- If Ableton Live is closed, open it and skip to #5.
- If Ableton Live is already open, go to Preferences.
- Go to Files & Folder.
- Click "Rescan plugins".
- Find the plugin in the Ableton plugins folder in the sidebar.
- Drag-and-drop the plugin onto your track at the bottom of the screen.
- Open Logic Pro X. Newly installed plugins should be detected automatically every time Logic is opened.
- If you've downloaded an effect or utility plugin, these can be used on an insert for any track in the mixer.
- Create a software instrument track if you downloaded a virtual instrument plugin.
- Under Default Patch, go to AU Instruments and choose the plugin you just installed.
- Open Pro Tools. Newly installed plugins should be detected automatically every time Pro Tools is opened.
- If you've downloaded an effect or utility plugin, these can be used on an insert for many types of tracks (Audio, Aux, Instrument, Master Fader...)
- If you’ve downloaded a software instrument, create a new Instrument track.
- Navigate to the Mixer and locate the newly created Instrument track.
- Select the desired instrument plugin by clicking on any of the Inserts on the Instrument track.
- Go to the Reverb SYNC Software and plugin Collection.
- Choose your desired plugin.
- Reverb will auto-detect your platform, so simply click the download button.
- Continue the installation process by following the prompt.
- Hover your mouse over the smart control button.
- Click Show Inspector icon.
- Click on plugins and choose your desired plugin.